Vue Cli with a Coldfusion/Lucee Backend
This guide will go through the steps required to setup a vue-cli applicaiton that works with a Coldfusion/Lucee powered JSON backend.
It wouldn’t take much to swap out the backend for static JSON, PHP or anything other language.
The point of the guide is to get a proxy setup so the local node development server on one port (e.g. npm server launching 127.0.0.1:4000) can happily consume the JSON data being supplied from another port (e.g. commandbox start launching 127.0.0.1:8080 )
This is going to allow fast application development in Vue.js with vue-cli, making use of hot module replacement that comes with the underlying webpack, alongisde my preferred method of back end scripting, which is all written in .cfc files and returning JSON data.
At the end we’ll go over getting this into production, on a DigitalOcean based Ubuntu server using Nginx. Again, it won’t take much tweaking to get this working on any provider, any OS, any webserver. The concepts should carry across all platforms, the key thing here is getting the local development proxy working.
Getting the back end started
I’m using Ortus Solutions’ CommandBox CLI on windows to easily launch a basic CFML site that returns some data in JSON format.
In the past I’ve generally worked with Adobe Coldfusion but for this project I’ll be using Lucee which is described as the following :
“Light-weight dynamic CFML scripting language with a solid foundation”
The main thing to note is it’s free and open source so you do not need to buy a license from Adobe to use CFML/CFScript. Only if you specifically want to use Adobe Coldfusion.
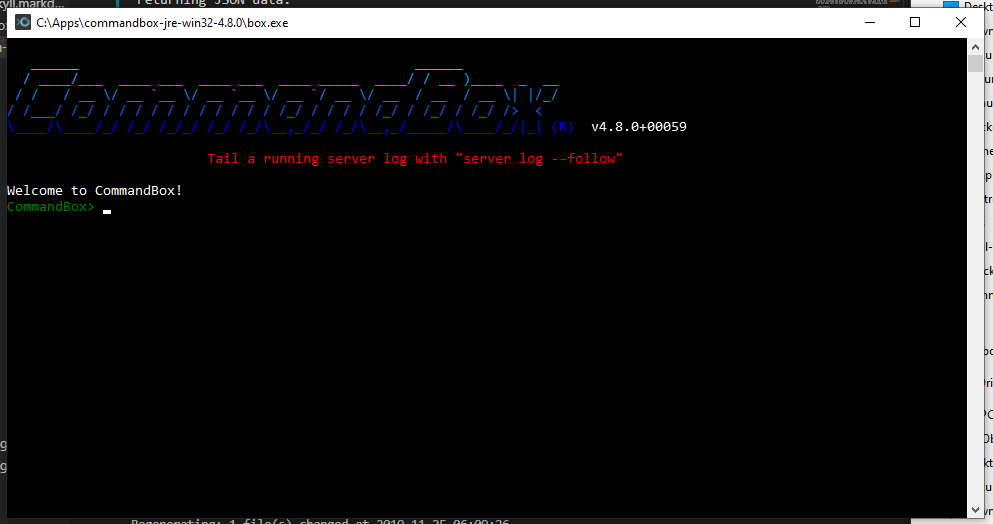
You can download CommandBox (with or without a JRE) as a zip, once you’ve unpacked it you can double click the Box.exe to launch the CommandBox window
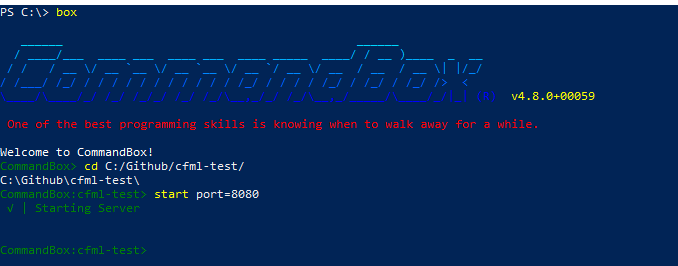
I prefer to run this via Windows PowerShell and the built in terminal in VSCode, which can be achieved by adding CommandBox to your Windows path.
The Ortus Solutions site helpfully has a decent installation section with a link to another guide for setting up your Windows Path: CommandBox Installation
Once CommandBox is installed and running, you can create a very basic file to serve some JSON content. Put this api.cfc somewhere on your filesystem with the following content:
component {
    remote function getPeople() {
        return [
            "Pete",
            "Picard",
            "Sisko",
            "Janeway"
        ];
    }
}
This funciton simply allows “remote” access via the browser and returns the array of people. In CommandBox, move to the directory containing this file and run start port=8080 (or box start port=8080 if you’re not inside the Command Box program ).
Once that is succesfully running you should be able to access the CFC in the browser and see the JSON response:
Open this URL to view the JSON:
http://127.0.0.1:8080/api.cfc?method=getPeople&returnFormat=json
Creating a vue-cli app
Now the backend is serving JSON, we can start building the Vue app.
You’re going to need to have npm installed and then install vue-cli. I wont go into details on how to do all that as the Vue CLI documentation covers that for us, you can check it out here
Note: npm would error during installation unless I ran powershell as administrator. Once my packages are installed I closed and re-opened it as normal
Using the command line (in my case Powershell) go to the directory you want to create your project in and type vue create .. Alternatively you can make a new folder with vue create vue-cf-together
For this app we’ll assume you’re working with the folder /vue-cf-together
Once you’ve triggered the create command, you’ll need to select features the features you want to use. You’ll be asked to choose from a preset, or manually select features.
Choose to manually select, then ideally save this to your own preset so you don’t have to do this every time.
You’ll need to select the following features
- Babel
- CSS Pre-processors
- Linter / Formatter
- Unit Testing
Optionally add Router or Vuex if you know you’re planning to use them (this guide doesn’t) but any feature can be added later on with vue add plugin-name
For the “CSS Pre-processor” select Sass/SCSS (with dart-sass)
For the “linter / formatter config” select ESLint + Airbnb config for additional features choose Lint on save
For the “unit testing framework” choose “Jest”
Select In dedicated config files for plugin settings
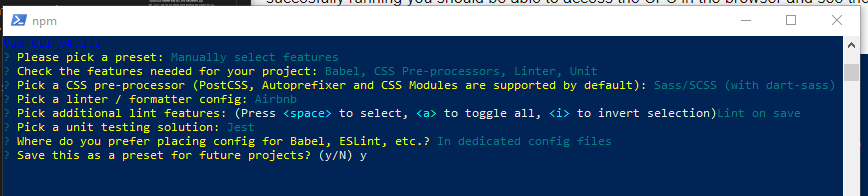
Press y, hit enter, enter a name for your preset and hit enter again.
vue-cli should start building the project for you.
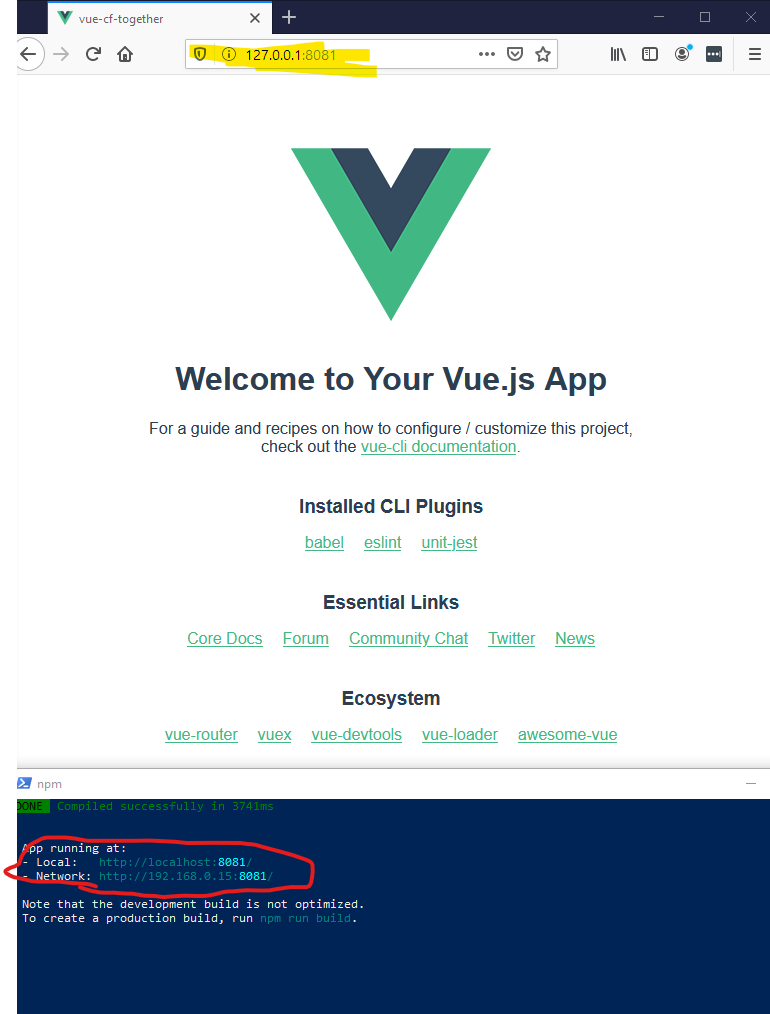
When it’s finished you should be able to run npm run serve and see the default app in your browser (you might need to cd vue-cf-together first depending on where you created your project)
Also not the command line will display the URL with the port number to access your Vue app.
Making a basic app
Modify the top level App.vue file which is in the vue-cf-together/src/ folder. Get rid of that default template and comment out the HelloWorld references for now, we’ll change them in a bit.
Something like this is fine for getting started:
<template>
    <div id="app">
        <h1>Awesome Apps.com</h1>
    </div>
</template>

<script>
// import HelloWorld from './components/HelloWorld.vue';

export default {
    name: 'app',
    components: {
    // HelloWorld,
    },
};
</script>

<style lang="scss">
    #app {
        background-color: salmon;
    }
</style>
With npm run serve still running you should see a quick compile in the console and the page should reload in the browser itself to show this wonderful page:

If you are seeing that, great! If you’ve played around with the template (or copy and pasting hasn’t quite worked) then you might get a bunch of errors like this:
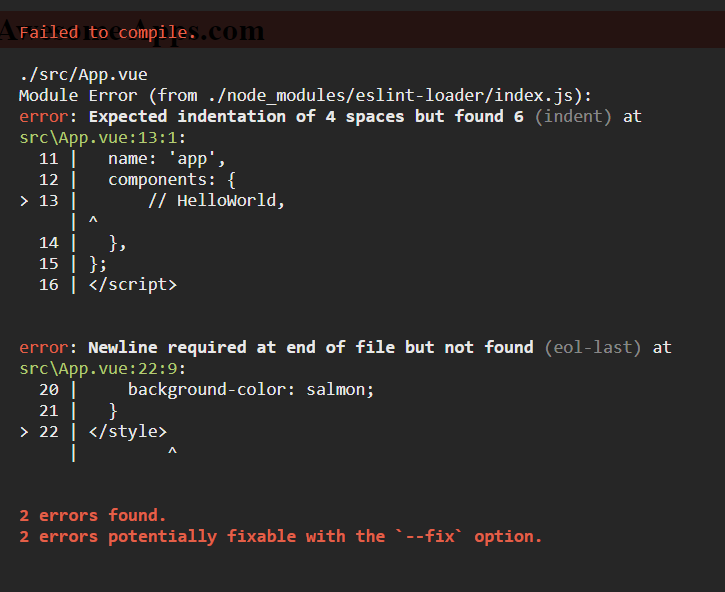
This is because we selected the “Airbnb linting” which checks your code to make sure it follows the very popular Airbnb Javascript Style Guide.
Now you don’t have to do this but I recommend it as it helps to minimize mistakes as you work and you can customise the rules (2 vs 4 spaces, camelCase vs underscore_variables etc)
Just try and fix the errors that are listed and they’ll show up as you make changes (lint on save!) so you can deal with them as you go.
Adding a Coldfusion/Lucee API
We’re getting to the best part now, getting your locally served CFScript AJAX API pumped into your vue-cli app.
We need to create a proxy server and a project path for the vue-cli server to find the Coldfusion API, as they’re being served on different ports (by npm/node and commandbox/lucee or something similar)
Create a vue-cf-together/vue.config.js file to include the following proxy settings in a devServer block.
This will redirect API calls to the Lucee server and for development allow us to ignore https/CORS issues.
module.exports = {
    devServer: {
        proxy: {
            '/api.cfc': {
                target: 'http://127.0.0.1:8080/',
                secure: false,
            }
        }
    }
};
If you get that setup properly, then we’ll be able to visit this in the browser:
http://127.0.0.1:8081/api.cfc?method=getPeople&returnFormat=json
This URL is almost exactly the same as the Lucee server itself apart from:
- port 8081 is serving the vue-cli app via node/npm
- port 8080 is serving the Lucee backend.
So we’ve told the vue app to send certain requests to a different port, in this case the api.cfc requests.
Calling the API from the application
We’ll make use of a second vue file to make calls to the API using https://github.com/axios/axios
Rename vue-cf-together/src/components/HelloWorld.vue to People.vue then update the App.vue so it’s referencing the new component.
    <template>
        <div id="app">
            <h1>Awesome Apps.com</h1>
            <!-- include our people component -->
            <People />
        </div>
    </template>

    <script>
    // import the file
    import People from './components/People.vue';

    export default {
        name: 'app',
        components: {
            // list the component in the app definition
            People,
        },
    };
    </script>

    <style lang="scss">
    #app {
      background-color: salmon;
    }
    </style>
Then update People.vue to contain the code below:
    <template>
        <div>
            <h2>People</h2>
            <div v-if="!arr_people.length">There is nobody here</div>
            <ul>
                <li :key="person" v-for="person in arr_people"></li>
            </ul>
        </div>
    </template>

    <script>
    export default {
    name: 'People',
    data: () => ({
        arr_people: [],
    }),
    };
    </script>
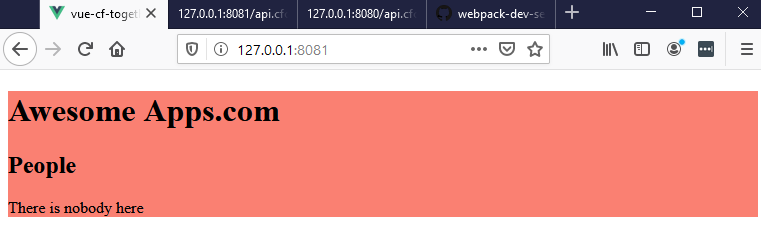
Make sure npm run serve is running and the browser should show you this even more amazing app, with the People.vue component rendered:
Stop the npm server and run npm install axios axios-cancel --save to install axios and the cancel library.
axios will make calls to the api, axios-cancel is used used to stop race conditions with ajax calls.
Then update the People.vue file to be like this, which will add buttons to add/remove people and make an AJAX call to get the CF file’s getPeople method
    <template>
        <div>
            <h2>People</h2>
    				<div class="warning" v-if="!arr_people.length">There is nobody here</div>
            <ul>
                <li :key="person" v-for="person in arr_people"></li>
            </ul>
            <button @click="getPeople">Get People!</button>
            <button @click="removePeople">Remove People!</button>
        </div>
    </template>

    <script>
    import axios from 'axios';
    import axiosCancel from 'axios-cancel';

    axiosCancel(axios, {
        debug: false, // default
    });

    export default {
        name: 'People',
        data: () => ({
            arr_people: [],
        }),
        methods: {
            async getPeople() {
                // name the request
                const requestId = 'get_people';
                // cancel existing request
                axios.cancel(requestId);
                // try and load people
                try {
                    const response = await axios({
                        url: '/api.cfc?method=getPeople&returnFormat=json',
                        method: 'GET',
                        requestId,
                    });
                    // set people to the data property
                    this.arr_people = response.data;
                } catch (err) {
                    // handle errors in the real app
                }
            },
            removePeople() {
                this.arr_people = [];
            },
        },
    };
    </script>
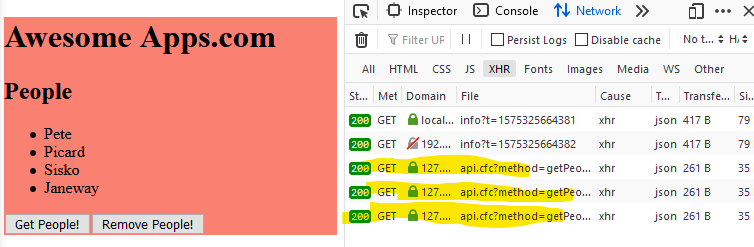
Clicking “Get People!” and “Remove People!” should toggle the app between these 2 states (making an AJAX call visible in the dev console with each “Get People!” click)
Now we have a perfect app, with hot module reloading and a proxy server to our Coldfusion API, we’re almost ready to build for production and get this app embedded inside our main website!
Unit testing
So ideally, you should have designed your tests before hand. You want to be writing them first, so you know what you want, watching them fail, then fixing your code till they all pass.
Maybe not quite as strict as that, but in general, make sure your writing tests and if you find a bug, write a test, watch it fail, fix the code, watch it pass.
We’re going to test that our People.vue loads, renders an empty list and shows a warning,.
Edit the tests/unit/example.spec.js file to look like this:
import { shallowMount } from '@vue/test-utils';
import People from '@/components/People.vue';

describe('People.vue', () => {
  let wrapper;

  beforeEach(() => {
    wrapper = shallowMount(People);
  });

  it('renders a People header', () => {
    expect(wrapper.find('h2').text()).toMatch('People');
  });

  it('renders an empty list and shows warning', () => {
    expect(wrapper.find('.warning').text()).toMatch('There is nobody here');
    expect(wrapper.findAll('li').length).toEqual(0);
  });

});
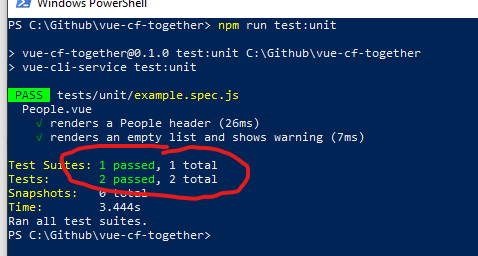
Then run npm run test:unit (you might have to stop your npm run serve command) and hopefully you’ll see an output like this, which shows:
- 2 tests have passed (the
itfunctions) - one of the tests had 2 conditions (
expect) that both passed
I dont’ want to spend too long on unit tests here, but these can and probably should get much bigger and more complex. I’m still not great at testing, don’t add enough, but I’m doing more than I used to and it’s massively helpful.
In short, the above tests do the following:
- we mount the
Peoplecomponent intowrapper - we want to know the “People header” is rendered
expect(wrapper.find('h2').text()).toMatch('People');- we’re expecting to find an h2 with the text “People”
- we want to know an empty list is shown with a warning
expect(wrapper.find('.warning').text()).toMatch('There is nobody here');- we’re expecting to find an elemenet with class “warning” that contains the text “There is nobody here”
expect(wrapper.findAll('li').length).toEqual(0);- we’re expecting a search for all
lito come back empty
Building for production
To make sure our tests are always run when building for production, add "prebuild": "npm run test:unit", to the scripts section of the package.json file to make sure our unit tests always get run before we make a production build.
Then you can run npm run build which should build a deployable version of our app into the dist/ folder, also making an index.html file for us.
The contents of dist can be served alongside your api.cfc on your CFML/Lucee/Coldfusion server in production, as the compiled .html/.js files don’t need Node, just a normal webserver (Apache/Nginx etc).